The rules are simple. 4 garments, to form at least 4 distinct outfits in a month. It can be for anyone, not just the self. And there are one or two women intending to sew more than one wardrobe (one for self, and one for another).
The boards have been buzzing with excitement and plans of the intended participants, along with confusion over some issues, including, most notably, a storyboard.
What is a storyboard? A visual of the participant's intended choice of patterns and fabrics to make the composite wardrobe. That way, everyone knows what is being talked about.
I am new to sewing and even newer to storyboards, and after a while, my response of "I am not sure, I have never done this before..." began to annoy even me. What kind of contest manager would not know the basics of what they were "managing", and if that involves storyboards, should I not know at least the basics about it?
So I began looking. PR has some helpful tutorials and information about storyboards, but the best place, by far, is Angie's Quality Time blog. Not only does she cover making a storyboard using Paint.net for PCs, but she also added a later tute for Mac users like me, using Preview.
As a contest manager, I cannot actually participate in the contest, obviously, but some have been known to sew along, and while I do not think my speed is anywhere near that stage as yet I had a little bit of fun (and frustration) putting together a rough composite of a mini wardrobe I would make my 4 year old daughter, had I the time and ability. The materials and patterns are a bit haphazard, and I do not necessarily own them, having taken many of the patterns and prints off online shops, but, after a little help from my husband, this is what I ended up with:
It is late here, after midnight, and so I am calling it quits here.
What I tend to see a lot of, on storyboards, is layering of fabric, patterns, line illustrations, which is ok, nothing wrong with that. For me, personally, I like seeing the fabric of choice filling the line illustration, to be able to better visualise if it will work. So, while I would have liked to have played a bit more with the layering effect, I am fairly happy with this for now.
Phew. Now, if people don't quite know what to do, or how to do it as far as this stuff goes, I can feel a bit more confident about pointing them in the right direction!
In other news, my son has been keeping me up late, and so I have been grumpy and generally TIRED. And that does not motivate me to sew. Or cut. Or trace. So my pile of stuff to sew is sitting, waiting patiently.
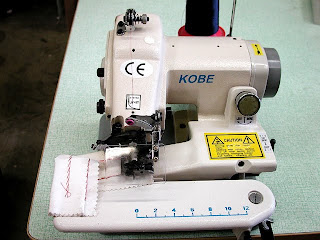
And in yet other news, this is the latest addition to my sewing adventures. A semi industrial blind hemmer.
Kobe. Made in Japan.
Did I need it? Probably not. Did I want it? Yes.
I have been dallying over it for about six months now, and hedging. In Australia, they retail for just over $1000. Way too much for me.
But, being short (5'3), I am forver altering pants and dresses when I buy them. And when my husband dresses in his religious garb, which is most of the time, he needs the length/ hems taken up to just above his ankle. Alteration costs money that adds up after a while, but more importantly, they never seem to do a good enough job.
So, I talked to my husband, and he says what he always says, subHanallah. "Get it if you think you will use it."
I would not have, except I got an exceptional deal on it, even with the cost of shipping. And so I bit the bullet.
Now to figure out how to work it so I can hem some clothes....


No comments:
Post a Comment